Sunday, April 22, 2012

Buttered-Popcorn Ice Cream Sundaes

Buttered Popcorn Sundaes
We love homemade ice cream but we are also pretty lazy people. Dirtying up a bunch of dishes and taking the time to cook and chill a custard base for ice cream just seems like too much work when we have a perfectly good no-cook, no-chill ice cream recipe that gets the job done. Ha! When have I ever let that stop me? I also have this darling little ice cream maker that I feel guilty about hardly ever using. It sits coldly in the freezer waiting to come out and play with all the other kitchen toys. I make a small amount of ice cream! it cries. No rock salt or ice needed! A mother can't play favorites, so I started searching for a small batch ice cream recipe and I found these Buttered-Popcorn Ice Cream Sundaes which sounded divine! Sweet and salty; cold and creamy; warm and gooey all at once.
Steeping
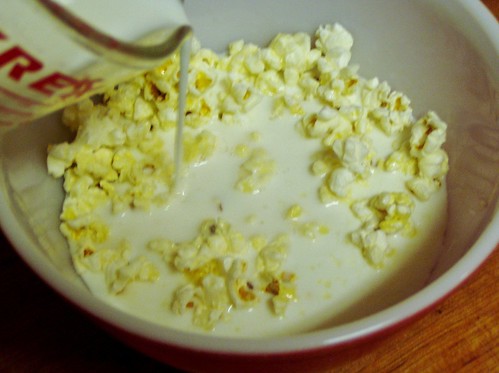
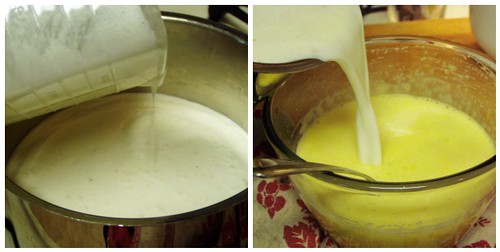
Start by steeping buttered popcorn (I would advise against microwave popcorn here as it has an unnatural butter oil on it that will leave this with a weird texture) in a mixture of whole milk, cream, corn syrup, and sugar.
Blending
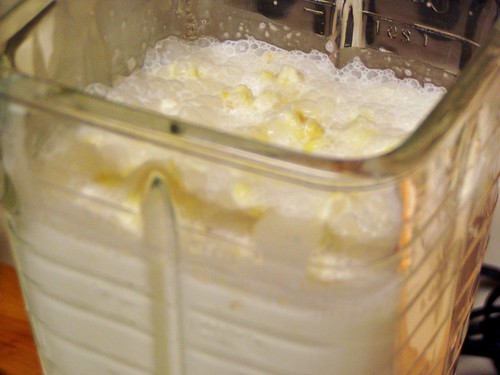
Puree it all in the blender, then pour it into a heavy saucepan and bring to a simmer. While this comes up to a simmer, beat egg yolks with sugar and salt until thick ribbons form.
Tempering
Once the cream mixture reaches a simmer, slowly pour a small amount into the egg yolks and stir. Then add a little more hot mixture to the egg yolks and stir. Keep doing this until you've added about 1-1/2 cups cream mixture to the eggs. This will prevent your egg yolks from getting scrambled which is what will happen if you just add them straight to the hot cream mixture. Pour everything back into the saucepan and cook for a few minutes until slightly thickened.
Spoon Path
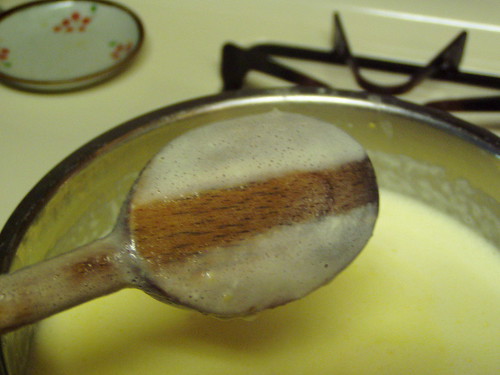
When you can swipe your finger on the back of the spoon and leave a path, it's done.
Straining
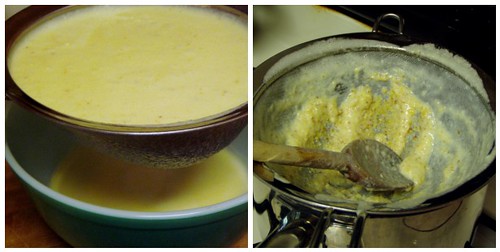
Strain into a large bowl, pressing with the back of a spoon to get it all through. You don't want to skip this step. It will strain out all the popcorn "pulp" and any egg strands that coagulated. Pour into a container, cover, and chill overnight. The next day freeze in an ice cream maker according to your maker's instructions. This yields about 3-1/2 to 4 cups of custard before freezing.
Caramel Sauce
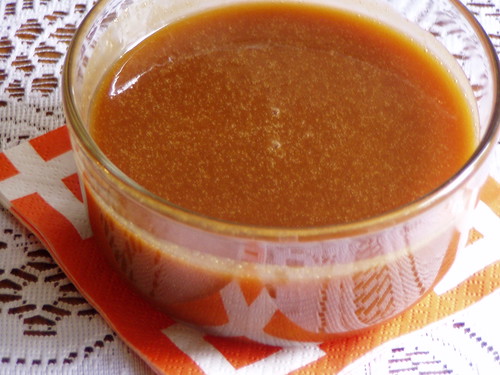
Now on to the toppings! First up, caramel sauce.

Combine water, sugar, corn syrup, and cream of tartar in a saucepan with room to groove as this is going to bubble up a lot after you add the cream. I used a 3-quart pan.
Caramel
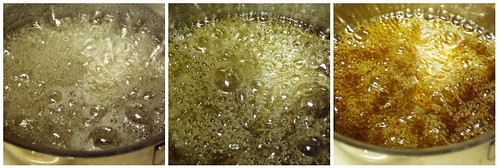
Cook over high heat without stirring until you see a little color starting around the edges of the pan, then start swirling the pan gently (think hula hoop motion) to even out the color and then don't move from the stove! Once the sugar starts to caramelize there are only seconds before you are at the color you want. When it reaches a deep amber color, turn off the heat.
Cream Explosion
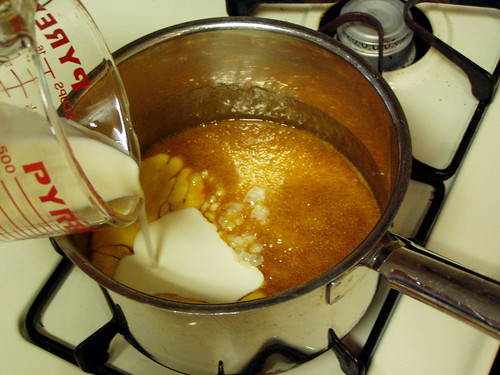
Add butter and cream. This is always my favorite part of making caramel because it bubbles and hisses and makes me feel like a mad scientist in the lab (Mwahhahaha!). Add vanilla and salt and stir until the mixture is smooth and liquid again. Store, covered, in the fridge for up to one month.

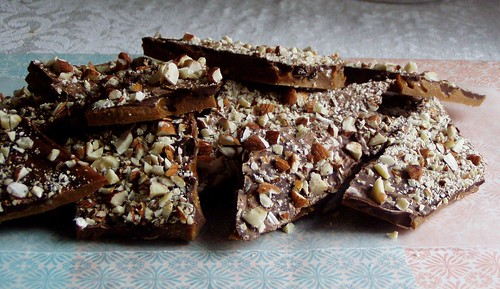
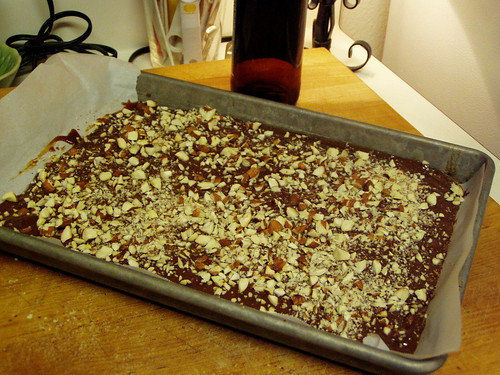
Now for the Peanut Butter-Chocolate Halvah. When I read this recipe, I had no idea what halvah was. Turns out it is a term for a sweet, crumbly nut-butter candy.
Peanut Butter Chocolate Halvah
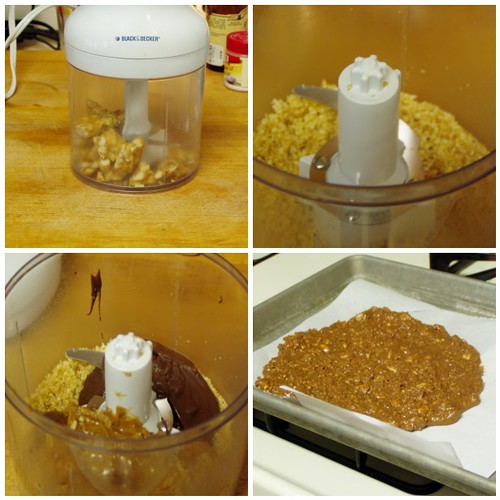
For this halvah, start with store-bought peanut brittle. Grind it up superfine in a food processor, add cooled melted chocolate and peanut butter and whir it up again. Dump onto a lined baking sheet and refrigerate until completely hard. After it has hardened, break it into small pieces and store in an airtight container in the fridge up to a day ahead.

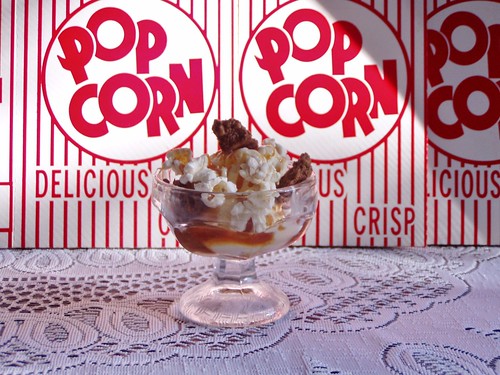
When you're ready to assemble this, rewarm the caramel sauce and place a small spoonful in the bottom of each bowl. Top with a couple scoops of ice cream, then drizzle with more sauce. Add a few pieces of halvah and plop a few pieces of buttered popcorn on top.

Original recipe here at Epicurious.


Monday, April 16, 2012

Scotch Eggs

Scotch Eggs

I have a problem.

I want to tell you about these Scotch Eggs but I don't think you are going to go for it.

Most people look at me in horror when I suggest covering a hard-boiled egg in sausage then rolling it in cheese cracker crumbs before finishing them off in the oven.

Scotch Eggs
Scotch Eggs

But what if I told you that traditional Scotch Eggs are rolled in breadcrumbs and fried but these are baked. And that one Scotch egg is the equivalent of eating one scrambled egg and one small sausage patty. And that they are less than 300 calories each.

No?

Well, then you didn't hear it from me that these are outstanding with a glass of beer or as a quick, satisfying breakfast (with or without the beer). This is the tastiest thing I know to do with leftover Easter eggs. Not that I'm telling you to make these. No, Sirree.

Scotch Eggs
adapted from Better Homes and Gardens, Brown Bagger's Cookbook

1/2 pound bulk pork sausage (light is fine)
4 hard-cooked eggs, peeled
1/4 cup flour
1 beaten egg
1/3 cup crushed cheese crackers or Ritz crackers

Make yourself a dipping station with three shallow bowls or pie plates.  Place flour in the first bowl, beaten egg in the second bowl, and the crushed cheese crackers in the third one. Divide the sausage into 4 equal pieces, then flatten each piece in the palm of your hand to make a thin, thin patty. Still holding the patty in your hand, place one hard-boiled egg in the center of the sausage patty and then gently wrap the patty around the egg so that it is completely covered. This may take a little readjusting and smooshing but be gentle and you'll get it all covered. Gently roll the sausage-covered egg in the flour, then gently in the egg letting the excess egg drip off, and finally, roll the egg in the cheese crumbs. Place on a parchment-lined or foil-lined baking sheet and repeat for the other 3 eggs. Bake at 375' for 25-30 minutes. Let eggs cool then refrigerate until completely cold. Store, covered, in refrigerator up to one week.

Friday, April 06, 2012

Coffee Toffee

Coffee Toffee

I decided at the beginning of the year (call it a resolution if you must) that I wanted to learn how to make candy. Partly because it is a dying art, my mother-in-law is one of the last few of a generation that knows how to make candy; and, partly because candy making scares me and, well, there are bigger things to fear in life. :)

The first candy type thing I ever made was a caramel base for an apple and nut tart. This was how I learned the importance of not using a rubber spatula whilst making hot molten sugar. One minute I was stirring along and the next minute I was holding just the handle, the rubber having disintegrated into my Thanksgiving dessert. I was undaunted and headed back into the kitchen the next morning with complete zen calmness and confidence that it would turn out, and it did.

The next thing I tried was marshmallows, and while I am not sure those were worth the effort, they were also a success. I moved on to hot fudge and other dessert sauces and I was all good and proud of myself. Candy Schmandy, I got this all licked.

However, there was this idea knocking around in my head that because I had never made any type of candy that required cooking to a certain and exact temperature, I hadn't really accomplished anything. Instead of heading to therapy, I headed back into the kitchen armed with a candy thermometer and the candy knowledge I had researched about such fiddly terms like "soft ball" and "hard crack" and phrases like "submerge tip of thermometer without touching the bottom" (what?!) and when to stir and when not to stir.

The first recipe I tried was this amazing Coffee Toffee from Smitten Kitchen. I dumped all the ingredients right in, gave it a stir, and clipped on the thermometer. Voila! Candy in the making. Then I started to get nervous. Maybe I don't have a good enough thermometer? Why does it smell so burnt? It's been boiling a long time, why hasn't it reached 250 yet!? This was when I decided that a beer reinforcement (for me, not the candy) and an attitude adjustment was in order.

Smeared (with beer reinforcement)
Try to ignore that beer bottle back there and just look at the yummy candy.

I firmly believe that candy can smell your fear. So, I casually sipped my beer while watching the thermometer and tried to project a light-hearted I-ain't-scared-of-you vibe through the air. When it reached 250', I stirred until it got to 300'.

I poured it into my prepared pan, spread it out a little, coated it in chocolate and nuts then checked on it every five minutes like a nervous first-time mother while it cooled and you know what? It turned out great. The coffee is the perfect balance to the rich toffee and I don't have to sell you on the addition of chocolate or nuts to anything, do I?

Coffee Toffee
very slightly adapted from Smitten Kitchen


1 cup (2 sticks or 8 ounces) butter
1/2 cup light brown sugar
1/2 cup white sugar
1-1/2 teaspoons molasses (Deb says you can swap corn syrup or honey but I wholeheartedly agree with her that molasses and coffee is a winning combination)
1/4 teaspoon salt
1-1/2 teaspoons instant espresso powder
1 cup semisweet chocolate chips
1/2 cup chopped almonds (toasted first, then cooled)

Butter, or line with parchment, a 9 x 13 sheet pan. In a 3-quart saucepan, combine butter, both sugars, molasses, salt, and espresso powder. Stir together, then clip your thermometer onto the pot submerging the tip but not touching the bottom. Cook over medium heat, stirring occasionally, until the thermometer reaches 250'F, then stir constantly with a wooden spoon or whisk until the temperature reaches 300'F.

Remove candy thermometer and pour onto your prepared baking sheet. You can spread the toffee out with an offset spatula but I found that tilting the pan gently did the trick. You are going to break this into pieces anyway so don't stress about it being perfect or completely filling the pan. Sprinkle your chocolate chips on top and wait a few minutes for them to melt, then spread them evenly over the toffee. While the chocolate is still soft, sprinkle the almonds over the chocolate and wait for the whole thing to cool and harden (this took about an hour in my kitchen).

When completely cool, break the toffee into serving pieces and store in the refrigerator unless you live somewhere with a cool climate. This should store for at least two weeks in the fridge or freezer.

Sunday, April 01, 2012