Apricot Pork Chops, Pan-Browned Brussels Sprouts, Roasted Red Potatoes
Grilled Steaks, Cauliflower Cakes
Slow Cooker Sweet-and-Spicy Chicken (Everyday Food, March 2012), Rice
Oven Baked Meatballs with Gravy, Kluski Noodles, Roasted Carrots
Lemon Cupcakes with Lemon Cream Cheese Frosting

Sunday, February 26, 2012
Thursday, February 23, 2012
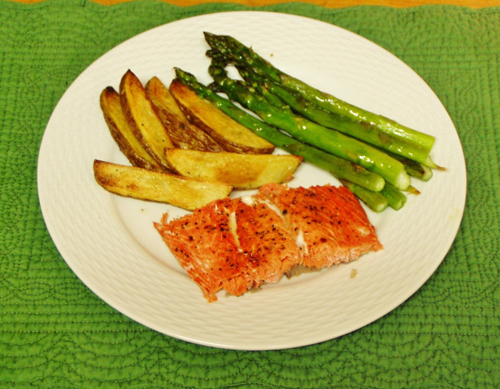
The Dinner Trenches: Baked Salmon, Roasted Potato Wedges, and Asparagus
I know I am not alone here when I say that I hate planning meals. I love to cook, but the planning for a whole week? Not so much. In the marital years B.C. (before children) a plan wasn't really necessary and it was of no consequence if we didn't eat until 8:30. Then the wee people came along with their demands to be fed all the time and I realized I had to get more disciplined about making meals. every. single. night. Meals that are quick, nutritious, economical, and moderately liked by everyone at the table. Not a small challenge and one that I think I am not going to be able to meet week after week. It has taken me 18 years of marriage and 4000+ dinners to get it working pretty well.
I am not going to bore you with the details of how I get dinner on the table because a) why would anyone want to read that and b) that might not be the way it works for you. Instead, I am going to start sharing some posts that feature complete dinner meals that you can make quickly and sometimes in advance.
Ready? Let's get started.

For this dinner you will need:
- 1 pound salmon fillet
- 1 pound asparagus
- 4 medium size potatoes
- olive oil
- salt and pepper
- the seasoning of your choice for the salmon (I used KC Masterpiece. Gourmet? no. Family Friendly? yes.)
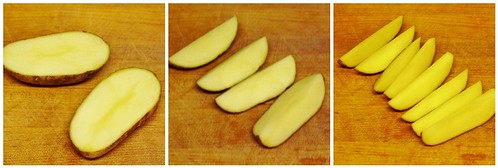
Preheat your oven to 450' and scrub your potatoes. Cut each potato into eighths.
Coat a rimmed baking sheet with 1-2 Tbls. olive oil or canola oil. Make sure it is evenly spread over the sheet. Place the potatoes, cut side down, on the baking sheet. Leave space between each potato and do not overcrowd the pan or the potatoes will steam, not brown. Season with salt and pepper.
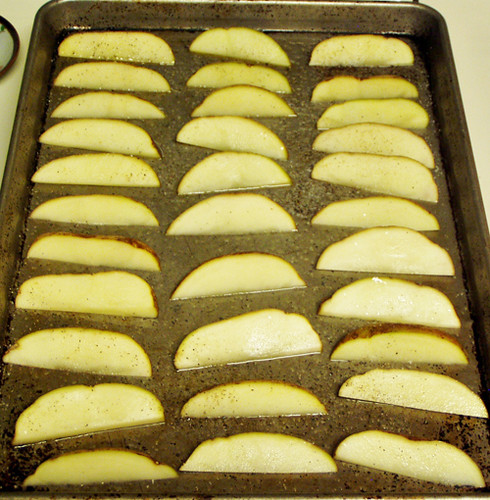
Roast the potatoes on the bottom rack of the oven (for the best browning) for 15 minutes. While the potatoes are cooking, wash and snap your asparagus. I like this method better than cutting because it ensures you don't get any tough ends. Hold your asparagus close to the end of the stalk and gently bend until it snaps.

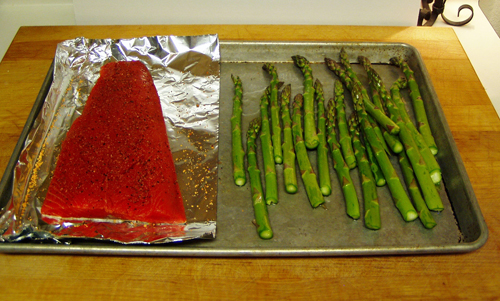
Place a piece of foil on half of another rimmed baking sheet and lay your uncut salmon fillet on top. No need to remove the skin from the salmon. After it is cooked you will be able to cut and slide the individual portions right off the skin. Season with 1-2 tsp. of your favorite seasoning. Place your asparagus next to the salmon and drizzle with 1/2 Tbls. olive oil, then toss to coat and season with salt and pepper.
Check the potatoes after 15 minutes to see if they easily release from the baking sheet and are browned on the underside; if not, then let them cook for another 5 minutes. If they are ready then flip them over on the baking sheet and put them back in the oven.
Place the salmon and asparagus in the oven on the rack above the potatoes and set the timer for 10 minutes. Your dinner is done when the potatoes are nicely browned on both sides. I test if the salmon's done by sticking a knife into the thickest part of the salmon and then touching the tip to my upper lip. If it is uncomfortably warm, then the salmon is done.
Make Ahead: The potatoes can be cut up and soaked in a bowl of cold water in the fridge as early as the morning of the day you want to make this. In fact, soaking the potatoes makes them even better. If you can soak them for even 30 minutes at room temp. before roasting it greatly improves the potatoes, but if you can't, that's alright too. The asparagus and salmon can be prepped and placed in the fridge; just cover the baking sheet with plastic wrap. When you are ready to cook, drain and pat the potatoes dry and proceed with the instructions above.
Thursday, February 16, 2012
Cincinatti Skyline Chili
Chili is one of those foods that invites passionate discussion about the "right" way to do it. To add beans or not? Tomatoes or not? Texas or Midwestern style? As a card carrying Texan it shames me to say that I really love Cincinatti-style chili, particularly Skyline Chili. With beans. And tomatoes.
Skyline is a chain of restaurants, mainly in Ohio and Kentucky, started in 1949 by a young Greek man named Nicholas Lambrinides. A good portion of my mom's family is from Cincinnati ("cin-suh-natta" as my grandma always pronounced it) and I grew up hearing about Skyline Chili. I have only eaten in the actual restauraunt a couple of times, but long before the days of Amazon, visiting relatives would bring cans of Skyline chili with them.
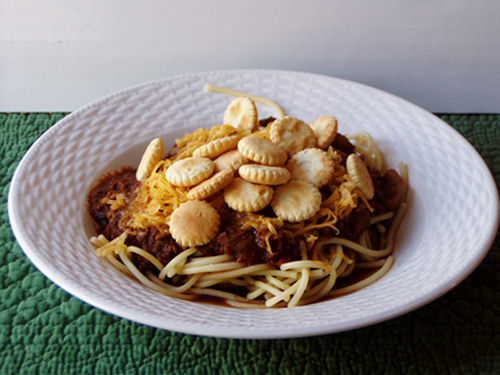
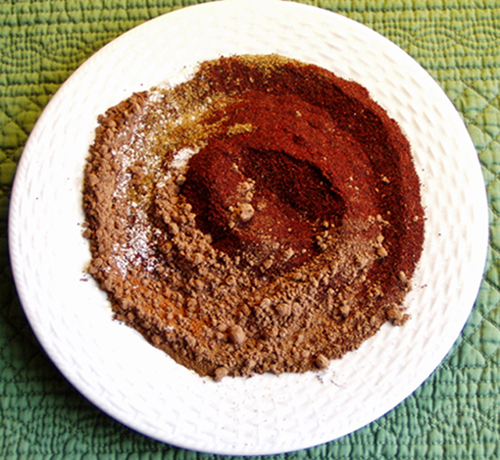
Nicholas Lambrinides' Greek background is evident in the cinnamon and cloves used in the spice mix which create a heavenly, spicy, caramel-y aroma while the chili is cooking. Skyline chili is also traditionally served over spaghetti, reminiscent of another Greek dish called Pastitsio. It is also fantastic for chili dogs.
 |
| Spice Whirl |
Skyline's recipe is a secret, of course, but a couple of years ago I experimented with copycat recipes on the internet and this recipe came pretty close.
You start by combining ground beef and water, breaking up the meat into very fine pieces as the water comes up to a simmer. This is an essential step in Cincinnati chili. The end texture and consistency should be like thin spaghetti sauce. Add finely chopped onions and garlic, tomato sauce, and a fragrant mix of cocoa powder, chili powder, cinnamon, cloves, cumin, cayenne, bay leaf, worcestshire, and vinegar. Simmer, uncovered, for a couple of hours and delight in how delicious your entire home smells. This makes a rather large batch but freezes and reheats very well. I like to freeze it in a few 1-cup portions to use for chili dogs.
When you order Skyline chili at the restauraunt it comes five ways:
1-way: just the chili
2-way: chili served over spaghetti
3-way: chili, spaghetti, and grated Cheddar cheese
4-way: chili, spaghetti, cheese, and onions
5-way: chili, spaghetti, cheese, onions, and beans
All "ways" are served with oyster crackers
Cincinnati-style "Skyline" Chili
adapted from about.com
6 cups cold water
2 lbs lean ground beef
3 Knorr Beef Bouillon Cubes
1 14-15 oz. can tomato sauce
2 yellow onions, finely chopped
4 garlic cloves, minced
1 Tbls.Worcestershire sauce
1 Tbls. unsweetened cocoa
1/4 cup chili powder
1 tsp. cayenne
1 tsp. ground cumin
2 Tbls. cider vinegar
1 whole bay leaf
1/4 tsp. ground cloves
1 tsp. cinnamon
oyster crackers for serving
cooked spaghetti to serve chili over, optional
shredded cheddar, chopped onions, kidney beans for serving, optional
Add beef and water to a 4-quart pot. Bring to a simmer while breaking up the ground beef with a fork until it is in very small pieces. Add bouillon cubes. Simmer for 30 minutes and add all the rest of the ingredients. You can serve the beans on the side, heated up, but if everyone you're serving this to likes beans, then I suggest adding one 15 oz. can kidney beans about 30 minutes before the chili is done. No need to drain, just open and tump in.
Simmer on low, uncovered, for 3 hours. Add water as needed if the chili becomes to thick.
Serves about 6
Sunday, February 12, 2012
Valentine Party Mix

We take Chex Mix very seriously in this house. My husband's grandmother used to make the original Chex Mix recipe every Thanksgiving and Christmas and we love it (including our kiddos who often come running when they hear the sound of cereal hitting a metal pan). To say my husband is a purist about the mix is putting it lightly. No bagel chips, thank you. No ranch seasoning. And you better hightail it out of town if you think you are going to suggest lemon and rosemary in Chex Mix.
 |
| Oh Target, let me count the ways I love you. |
However, he also really loves Reese's peanut butter cups so I figured that cereal mixed with peanut butter and melted chocolate could be worked into the rotation. Change is good.
 |
| Meltage, Mixage, Coolage |
I had this Valentine version at book club a couple of weeks ago and it opened my eyes to the possibility of using seasonal holiday sprinkles to dress up the mix. If you are crazy enough to sign up to be the room mom every year love supporting your kiddo at school, something like this is golden. You could package this up in little bags to give away or bring it for a Valentine's party. It goes without saying that it would be cute with any holiday sprinkles. I strongly recommend that you make the 1/2 recipe listed below unless you are serving this to more than a dozen people. It's pretty sweet and a little goes a long way.
Valentine Chex Mix from Betty Crocker
4 1/2
cups Rice Chex® cereal
1/2
cup white vanilla baking chips
1/4
cup peanut butter (I used natural nutty peanut butter without any problems)
2
tablespoons butter or margarine
1/3
cup powdered sugar
1/4
cup red, white and pink candy-coated chocolate candies
2
tablespoons red or Valentine-themed sprinkles
Place cereal in medium bowl. In small microwavable bowl, microwave vanilla chips, peanut butter and butter uncovered on High 1 minute to 1 minute 30 seconds, stirring every 30 seconds, until melted and smooth. Pour peanut butter mixture over cereal, stirring until evenly coated.
Place 1/2 of the cereal mixture in 1-gallon food-storage plastic bag. Add powdered sugar. Seal bag; shake until well coated. Spread on waxed paper or foil; cool about 15 minutes.
Meanwhile, stir candies and sprinkles into remaining cereal mixture. Spread on waxed paper or foil; cool about 15 minutes.
In serving bowl, mix both cereal mixtures. Store in airtight container.
Makes 11 servings (1/2 cup each)
Friday, February 10, 2012
Chipotle Shrimp Taco with Avocado Salsa Verde

I have had tacos on the brain lately. In part because I have discovered that delicious soft corn tortillas, grilled for just a minute over a gas flame, can transform the humblest of ingredients into something crave worthy. So every couple of days I start thinking, "What can I put inside of a charred corn tortilla?" And boy are there a lot of choices, but I was on the lookout for something I hadn't tried yet, something with ingredients that my kids would never eat, perfect for lunch but quick enough to not interfere with my other current obsession.

The salsa was quick to blend up in the food processor and the shrimp only took one or two minutes to grill. I did not use the seeds of the jalapeno (I know, I'm a wuss) and it was medium spicy. I also dialed back the salt to 3/4 tsp. kosher salt with no ill effect. In the 20+ years I have lived in Texas, I have never cooked with a tomatillo. I didn't know what I was missing! It was easy to prep and added a tangy crunch to the salsa. I am going to be looking for more ways to utilize them!

Chipotle Shrimp Taco with Avocado Salsa Verde
(barely adapted from Food Network)
Avocado Salsa:
1 small onion, quartered
1 jalapeno, quartered, seeds optional
1 garlic clove, smashed
4 medium tomatillos, (about 8 ounces) husked, rinsed, and coarsely chopped
1/2 Hass avocado, peeled, seeded, and cut into chunks
3/4 teaspoons kosher salt
1/4 cup loosely packed fresh cilantro leaves, coarsely chopped
Shrimp:
1 tablespoon olive oil
1 teaspoon chipotle or blended chili powder
1 teaspoon kosher salt
1 pound medium shrimp (about 20), peeled and deveined
8 corn tortillas
1/4- 1/3 cup queso fresco, crumbled
1/4- 1/3 cup queso fresco, crumbled
8 sprigs cilantro for garnish
2 limes, cut into wedges
Put the onion, jalapeno, and garlic in a food processor and finely chop. Add the tomatillos, avocado, and salt and pulse until chopped but still chunky. Transfer to a bowl and stir in the cilantro.
Heat a stovetop or outdoor grill to medium-high. Mix the olive oil, chipotle or chili powder, and salt in a large bowl. Add the shrimp and toss to coat. Grill the shrimp until translucent, about 1 1/2 to 2 minutes on each side.Grill tortillas, until slightly charred and pliable, about 20 seconds per side*. (Alternatively, wrap in a damp paper towel and heat in a microwave.) Spoon sauce on the tortilla, then top with about 2 or 3 shrimp, a generous half tablespoon of cheese, and a sprig of cilantro. Serve 2 tacos per person, with a lime wedge on the side.
*I'm very sure that if you do not live in a place where spring starts intermittently in February, that you could cook these shrimp in a hot cast iron skillet and char your tortillas over the gas flame of your stove burner.
Thursday, February 02, 2012
Tea Party

Oh boy, have I been working on this post for awhile! For my mother-in-law's birthday, my sister-in-law came up with the idea to have a tea party and invite some of my mother-in-law's friends. I had the best time planning this party and making and setting up all the food and I'd like to share it with you. I'm going to give you links to the recipes we used so this post is not overly long. If you want any more details, let me know.

At this table we had Citrus Salad, Stuffed Mushrooms (in the chafing dish), Cucumber Carrot Bites, Pimento Cheese on Pumpernickel Tea Sandwiches, Olive-Nut Cheese on Wheat Tea Sandwiches (these are much more tasty then their name implies), and Ham on White and Wheat with Chive Butter Tea Sandwiches which turned out cuter than I could have expected.

I used chives to make "grass" on a tissue and wax paper-covered cake board. Then I cut out bread and ham with a flower cutter (using a small round cutter for the middles), then spread the bread with Chive Butter (1 stick softened butter mixed with 2 Tbls. fresh chives and salt and pepper). I was inspired by this picture I found on Pinterest. All of these tea sandwiches can be made a day ahead. Cover them very tightly with plastic wrap then put a damp paper towel on the top, then wrap in plastic again. Your sandwiches will be nice and moist for the next day.
This table had some cheese and more Olive-Nut Sandwiches, Strawberries Romanoff, Whole Wheat Raspberry Ricotta Scone Bites, and Mini Lemon, Blackberry, Mascarpone Puddings. I made the scones a week in advance, cut them very small, then froze them in a ziploc bag until the day of the party. I popped them into a preheated oven, still frozen, and baked for 7-10 minutes.

The puddings I assembled the day of the party in 2 oz. shot glasses, but I made the lemon curd (you could use store bought) three days ahead, toss the berries with the sugar and limoncello the night before, and well, anytime you're feeling a little aggressive, crush the gingersnaps and seal them in a plastic bag. I used store bought gingersnaps but I really wanted to try it with these. I just ran out of time. It is positively nerdy how happy these little puddings make me. I need a 10 step program for my addiction to mini-food.

And, of course, what's a tea party without tea? We had four kinds of delicious tea (selected by the birthday girl) including that lovely flowering tea on the right which I had never used before but was really fun.

Last, but not least, we had these little molded sugars for everyone's tea and it made so many we bagged some up for favors as well. I'm going to explain more about how I made those in another post.
So, that's it! I hope you are inspired and will plan a tea party soon.
Subscribe to:
Posts (Atom)