Sunday, November 02, 2014

Carnitas-Style Tacos with Caramelized Onions and Mushrooms

Untitled
If you saw this in the store, what would you make with it? Sandwiches? Me too. Predictability is fun. Then one day I decided to heat up the last little bit left in the package in a cast-iron skillet before adding the BBQ sauce. I discovered that the pork became crispy, much in the same way that carnitas is delectable because of the little bits of fat-marbled pork that turn into crunchy bits (same cut of meat--pork butt). It dawned on me what a delicious shortcut this could be to carnitas-style street tacos. That made it sound like I've been to Mexico and know anything about Mexican street vendor food. I haven't. But I want to and I've watched a lot of Mexico--One Plate at a Time which totally counts.
My creation
The Taco Trifecta: Caramelized, Charred, Crispy
Normally this would be the part where I extol all the virtues of cooking at home: economical, more nutritious, life skills, blah, blah, blah; but, truthfully, I like to eat out and save the kitchen mess as much as anyone else. I am, however, also essentially lazy and going out requires effort. and pants. When you cook at home, people are far less preachy about your lack of pants. So on some pants-optional Tuesday night, I encourage you to get in the kitchen and fix up what has quickly become one of my family's favorite taco recipes.

Carnitas-Style Tacos with Caramelized Onions and Mushrooms
Serves 4

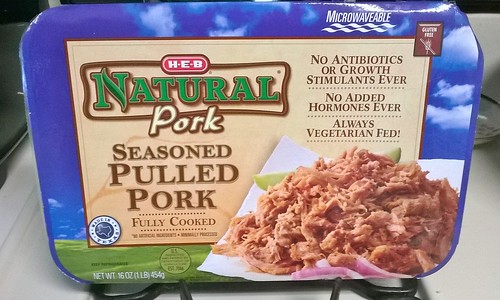
You see that I am shamelessly pimping HEB's precooked shredded pork. They are in no way sponsoring this post (bastards), I just really like this product (HEB, if you are reading, sorry about the bastard thing. Funding towards the ridiculous amount of money and time I blow at your store would be great.). You can use any cooked shredded pork which is available to you as long as it does not have sauce already mixed in. We have used leftovers from pork butt that my husband smoked or even restauraunt leftovers.

8-10 ounces (2 to 3 cups) precooked shredded pork*
8 ounces white button mushrooms, washed and quartered
1/2  of a large white or yellow onion, peeled and thinly sliced
2 Tbls. olive oil
1 Tbls. butter
8 flour or corn tortillas (if using corn tortillas, you may want to allow 3 per person as they are usually smaller)

For topping:
Chopped fresh cilantro
Sour cream
Salsa
Cotija or queso fresco cheese
Thinly sliced avocado

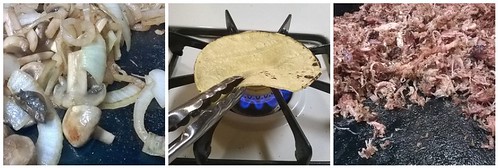
In a large cast-iron skillet, heat butter and 1 tablespoon of olive oil over medium-high heat. Add the onions and mushrooms and cook just until onions start to wilt and the mushrooms start releasing their liquid. At this point, reduce the heat to medium and stir only occasionally (reducing the heat a little if necessary to prevent burning) until the onions are caramelized and the mushrooms are browned, about 15-20 minutes. Remove from skillet and keep warm in a separate container while you heat the pork.

In the same skillet you used for the onions and mushrooms, heat the remaining tablespoon of olive oil over medium-low heat (the pork is already cooked, so you don't want to overheat it) and add the pork, breaking it up with a fork so you have shredded bits in the pan. Heat gently for 5-10 minutes, occasionally scraping up the browned bits from the bottom of the pan, until you see that most of the shreds of meat are crunchy and brown. Remove from heat while you get your tortillas ready.

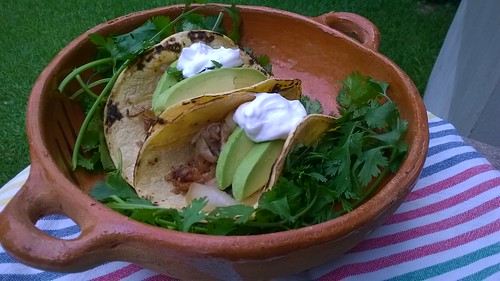
Over a gas flame (or in a clean skillet if you don't have a gas stove), heat each tortilla until it gets charred, blistered marks on each side. Do not walk away while you are doing this! Tortillas burn quickly. Fill each tortilla with a couple of tablespoons of shredded pork and top with about 1/4 cup of the onion and mushroom mixture, then add your favorite toppings. My favorite combo is fresh cilantro, cotija cheese, Julio's salsa, and avocado. Divine.
 
*This recipe does not require the whole package of shredded pork. I usually divide what is left into individual portions and freeze it for sandwiches or to add to slow-cooker beans.

Monday, October 27, 2014

On the Menu this week

A short one, but I wanted to collect the oh-so-amazingly-good book club treats in one place and also share them with you :)

Carnitas-style Tacos with Caramelized Onions and Mushrooms (why haven't we talked about this yet? Soon. Pinky swear.)

Book Club:
Salted Caramel Chocolate Thumbprints
Strawberry Ghosts
Chicken and Spinach Pinwheels
Mexican Corn Dip
Prosciutto Wrapped Shrimp with Smoked Paprika
Bacon and Swiss Dip with cut up celery, carrots, and rye crackers

Slow cooker beans, Sautéed Kale, and Cornbread

Apple Cider Caramels
 (already made these twice. divine. but, dang, that's 128 hand-wrapped pieces of candy.)

Sunday, September 21, 2014

Sunday, July 20, 2014

Perfectionism is a Trap Blueberry Pie

The other morning I was thinking of how often pie is mentioned or featured in movies (maybe you think of grown-up things like 401Ks and vacation plans but this is how it works in my mind palace) which got me to thinking of one of my favorite pie-centric movies, Waitress.  In the movie, Jenna, an unhappy, pregnant pie baker imbues her pie creations with emotional sometimes hilarious names like "I Don't Want Earl's Baby Pie" or "Pregnant, Miserable, Self-Pitying Loser Pie".
Crust
I started wondering what I would name this pie at this moment in my life. Blueberries Were on Sale While I Was at the Store Ah-gain Pie? Why Can't I Always Have What I Want Pie? Making Pie is More Fun than Mopping Floors Pie? Perfectionism is a Trap Pie? Yep, that's the one. Perfectionism is a trap. This is one of the many lessons I am learning right now and I think it fits perfectly with pie making.
Pie fitted
Crimped
A lot of people are overwhelmed at the thought of making their own pie crust. I used to be one of those people. But for heaven's sake, it's just a pie crust! It doesn't have to be perfect to be good and it will never be good if you don't try frequently and learn from your mistakes. Oh snap, I think that was a metaphor for life right there. Sneaky.
Streusel
I could have spent my pie-making time mopping another floor or cleaning another toilet but what's better for my soul right now? Making pie. There's something so satisfying to me about tying on an apron, sprinkling flour on the board, taking the rolling pin in hand and gently but firmly transforming the humblest blob of ingredients into a vessel within which endless delicious fillings are possible. Also? Homemade pie seems to impress the shit out of people. Seriously. I don't think I could garner more astonishment if I performed brain surgery with a butter knife. No one's gonna notice those dirty floors if the pie is delicious. Promise.
Prebaked

Perfectionism is a Trap Blueberry Pie
I often have this inner dialogue with you when I am making a recipe that I'd like to blog about. I wonder how much detail I should give you or how many "helpful" tips I should include or, if you're not a big food-science nerd like me, how much you really want to know about such things. The irony of giving you 872 tips on making the perfectly imperfect pie crust is not lost on me. So I am including a link to Pie Crust 101 should you like to read up on the things that go into making a more successful pie crust, but I promise, you can also just dive in here and get to makin' and learnin'. It's gonna be fine.

Pie Crust
1 1/4 cups flour
1/2 tsp. table salt
1/2 Tbls. sugar
1 stick unsalted butter, very cold, and cut into small pieces
Ice cold water

Fill a measuring cup with ice and water. Set aside while you mix the crust. Mix flour, sugar, and salt together in a large, wide bowl. Using a pastry blender or your impeccably clean hands, work the butter into the flour mixture until you have pea-sized lumps of butter. Add 4 Tbls. of ice water (just the water! Leave any unmelted ice in the cup.) and mix gently with a fork or spatula. At this point, add the water 1 Tbls. at a time until the dough starts to hold together (it's better to err on the side of the dough being a little too wet than too dry.) Form dough into a ball, wrap in plastic, and refrigerate for at least 30 minutes. You can make the dough at least two days in advance and keep wrapped in plastic in the fridge. You might need to let it soften slightly before rolling it out if you do that.

Streusel topping
6 Tbls. unsalted butter, very cold cut into small pieces
1/2 cup packed dark brown sugar
3/4 cup flour
pinch of salt

In the bowl you just pulled the pie crust out of, mix together the flour, brown sugar, salt, and butter using  a pastry blender or your fingers until the mixture resembles coarse sand. Store in fridge until ready to top your pie.

Blueberry Filling
3 pints (approx. 6 cups) fresh blueberries
1 cup sugar
1 Tbls. lemon juice
4 tsp. cornstarch
pinch of salt
 
In a large bowl, combine blueberries, cornstarch, sugar, lemon juice, and salt. Mix together, mashing some of the berries slightly to create juice. Set aside while you roll out your crust.

Assembly:
Preheat oven to 350'. On a lighly floured surface roll out your pie crust, sprinkling the crust, the pin, and the board frequently with flour to prevent sticking. I also like to slide a floured spatula under the crust after every few rolls just to make sure that sucker isn't going to stick. Fold crust in half, then gently lift and settle into pie plate and unfold the crust. Fold under the raw edges of the crust and crimp the edges to your heart's desire. Remember it's about taste not perfect beauty. Pile in the blueberry filling, leveling it out a little, then sprinkle the streusel on top. It will seem like too much, it's not. Place pie on a rimmed cookie sheet (trust me on this, fruit pies like to overflow. You don't want that in your oven) and bake for 60-75 minutes until streusel is browned and blueberry filling is bubbling. Cool completely at room temperature.


Wednesday, June 18, 2014

Boys ♥ Pancakes

Untitled
I started this post thinking that I was going to write about the evils of mixes and chocolate-frosted sugar bombs for breakfast. But that would make me a huge hypocrite because, well, we have our share of Toaster Strudels and that cereal-that-shall-not-be-named-that-shouldn't-even-bother-with-the-cereal-part-because-we-all-just-want-the-marshmallows. We try to do better. We're not perfect.
           I was also going to tell you how it's really not that much more work to mix pancakes from scratch (it isn't) and how I have made these pancakes so many times that I can do it with one eye open and only half a sip of coffee down my throat and that I don't even need the recipe anymore (this is truly I think the secret to all cooking longevity), but I realized while making these the other morning that these pancakes are really about my boys. They started as a need to find a small batch recipe that suited the breakfast needs of a toddler and his mama. Then expanded to feed another toddler while the previous one morphed into a teenage boy while I wasn't looking.
Untitled
These pancakes are about little boys getting their first start cooking in the kitchen. Pulling chairs up next to the stove to mix, pour, and stir. About requests to have them shaped into hearts with strawberries inside, Star Wars vehicles, and bats and ghosts. To experiment with peanut butter and bananas between two pancakes when my oldest son created a portmanteau "panwich", because the fact that he knows what a portmanteau is and delights in creating them makes me beam with pride. That the little one prefers his with powdered sugar instead of syrup like his mother. About sleepyheads at the breakfast table with mouths full of pancakes, "Mom, you make the best pancakes." ♥ ♥ ♥ Pancakes. Who knew?

Small Batch Buttermilk Pancakes
makes about 5 to 6 4-inch pancakes
I often mix up the dry ingredients and store it in snack size plastic bags for one less step in the morning, or I measure out the dry ingredients the night before. These are great plain but we have also been known to sprinkle a tablespoon of chocolate chips to each pancake after it's poured in the pan, or a few fresh blueberries, or small-diced strawberry.

1/2 cup flour
1/4 tsp. baking soda
1/4 tsp. salt
1 tsp. sugar
1 egg
1/2 cup buttermilk
1 Tbls. veg oil

In a small bowl mix the flour, salt, baking soda, and sugar. Measure 1/2 cup buttermilk, add the egg and oil to the measuring cup and mix until fully incorporated. Add the liquid ingredients to the dry ingredients and mix gently just until the dry ingredients are moistened. A few lumps are fine. Spoon about 3 Tbls. batter onto a medium-hot greased pan or griddle. If using an add-in, sprinkle on top of the pancake now. Cook 1-2 minutes until edges look dry and bubbles form across the surface. Flip and cook 30 seconds to a minute on the other side.

Hearts
Freestyle heart making: Spoon about a tablespoon of batter on the right side. Spoon a second tablespoon of batter on the left side creating a V-shape. Smooth out your heart shape.

Monday, June 16, 2014

Cheddar Cornbread Waffle Sandwiches with Pulled Pork and Almond Coleslaw

Untitled
Waffles. From a mix. Buttermilk. Raised. Buttered. With or without syrup. With fruit baked inside. Gingerbread. These are about all the ways I have dabbled in the waffleverse and it's probably why I still have the waffle maker I received as a wedding gift (and the husband that came with it). It only comes out for use a couple of times a year (the waffle maker not the husband), but apparently I have been living under a rock because waffles are not just for breakfast anymore! Hell's bells, sometimes they're not even for waffles
A few weeks ago we tried Joy's delicious BLT waffles and I immediately started to imagine other sandwich to waffle conversions: open-faced cornbread waffles with chili, waffle reubens, or herbed waffles with gouda and ham, but first up, these cornbread-style waffles with pulled pork. The traditional pulled pork and coleslaw sandwich is more of a Carolina-style pork with no sauce and a vinegary slaw. This sandwich incorporates a little southern-style cornbread with sweeter pulled pork topped off with cool, creamy coleslaw. I haven't even told you the best part about using your waffle maker for sandwiches--all the benefits of fresh bread without having to fuss with rising, waiting, or heating up the oven (August is coming, people). Sheer genius.

Cheddar Cornbread Waffle Sandwiches with Pulled Pork and Coleslaw
One recipe made 4 full-sized Belgian waffles which made 8 mini-sandwiches which was plenty for 4 people. You could easily add a little chopped fresh jalapeno to the batter if you like spicy cornbread or 3/4 cup fresh or frozen corn kernels. I used packaged pre-cooked pork (for my local peeps I cannot say enough about HEB's Natural Seasoned Pork, we need to talk about tacos soon). Do ahead: the waffles can be made anytime and frozen tightly wrapped in plastic, then reheated in the oven or toaster oven until crispy again. The coleslaw and dressing can also be prepared a day in advance and stored separately in the fridge until right before serving. This recipe makes more coleslaw than you need for the sandwiches, so if you're not about leftovers--in which case I'm not sure who think you are--I'd make half the recipe.

Cheddar Cornmeal Waffles
3/4 cups all-purpose flour
3/4 cups cornmeal
1 1/2 teaspoons baking powder
1 teaspoon granulated sugar
1/2 teaspoon table salt
1 cup buttermilk
1 tablespoon unsalted butter, melted and cooled slightly
1 large egg
1/2 cup finely grated cheddar cheese
1/2 to 3/4 cup frozen or fresh corn kernels (optional)
1 jalapeno, seeded, deribbed, and finely chopped (optional)


Mix together dry ingredients. In a separate bowl, beat together the buttermilk, egg, and cooled butter. Gently fold wet ingredients into the dry ingredients, stirring just until moistened. Add cheddar, corn, and jalapenos, if using. Cook according to your waffle maker instructions. If your waffle maker is unseasoned you may need to spray it with a little non-stick spray first.


For the Pork
2 to 2 1/2 cups shredded pre-cooked pork
1/3 to 1/2 of your favorite barbecue sauce
Nothing magical here. Mix and heat in microwave until warmed through.


Coleslaw
2 1/2 cups shredded green cabbage
1/2 cup chopped celery
1/4 cup chopped green pepper
1/4 cup chopped cucumber (peeled first)
3 Tbls. onion (green, white, or yellow works fine)
1/2 cup slivered almonds, toasted and cooled
1/2 cup mayonnaise (light is fine)
3 Tbls. half-n-half, whipping cream, or heavy cream
salt and pepper to taste

Toss together cabbage, celery, green pepper, cucumber, onion, and almonds. If not serving right away, cover tightly and refrigerate. For the dressing combine mayo, cream, salt, and pepper in a separate bowl. Refrigerate if not using immediately. Right before serving, toss the veggies with the dressing.

Wednesday, February 12, 2014

Brown Butter Blueberry Muffins//Joy the Baker Cookbook

Brown Butter Blueberry Muffins
Do you know Joy the Baker? She has a superb blog filled with casual musings, tempting sweets, healthy smoothies, and luscious sandwiches. Let me stop here a minute and say, seriously, Joy is a stone cold sandwich genius--Coffee Bacon Sandwiches; Grilled Ham, Cheese, Pickle, and Potato Chip Sandwich; Spinach and Artichoke Grilled Cheese--and those are just the ones I have tried!

It is completely inexcusable that it took me so long to dive into her first cookbook.

Um, we should all look this sexy when we bake.
This book has beautiful photography, a picture for each recipe (always appreciated), a helpful chapter on baking tips: What's cake flour? What if I don't have ____?,  Joy's signature humor, a healthy mix of decadent recipes (Smores Brownies, Baked Chili Cheese Fries, Peanut Butter Birthday Cake) and healthy ones too (Toasted Oat Smoothie; Flaxseed and Black Pepper Crackers). Joy's book challenges a novice baker to learn a few new things and offers experienced bakers many tempting new spins on traditional recipes. I couldn't narrow it down to one recipe to try so I sampled:

Untitled Cocoa Almond Granola which I should have taken out 5 minutes sooner as mine got a little too toasty. Completely delicious on coconut greek yogurt with strawberries on top.
 
Bacon Peanut Butter Cookies
Bacon Peanut Butter Cookies that I didn't trust because they sounded so over the top and didn't call for flour--they were and I shouldn't have worried about it. Bonus: These are gluten free. Amazing doesn't even begin to cover it.

Untitled And the one I'm going to share today: Brown Butter Blueberry Muffins. Warm from the oven with tiny flecks of browned butter and a crunchy streusel topping? More of my mornings should start like this.
 
I misread the ingredient list when I was at the store and bought only half the amount of fresh blueberries called for but I didn't feel that the muffins were lacking anything even with my oversight.
Brown Butter Blueberry Muffins
7 Tbsp unsalted butter
1/3 cup milk
1 egg
1 egg yolk
1 tsp vanilla
1 1/2 cups flour
3/4 cup sugar
1 1/2 tsp baking powder
3/4 tsp salt
2 cups blueberries (fresh or frozen; if frozen, thaw first and pat dry before adding to batter)
 
Topping:
3 Tbsp unsalted butter, cold
1/2 cup flour
3 Tbsp sugar
 
Preheat your oven to 375 and line a muffin tin with 12 paper liners.
 
Melt the butter in a small skillet or saucepan over medium heat. Watch the butter during this time. First it will melt, then crackle as the water evaporates out, foam, and then start to get little brown flecks as it toasts. Stir a couple of times during this process to distribute the browning. When the butter is a nice hazelnut color, pour it into a heatproof dish (don't leave it in the pan as you run the risk of further browning and possibly burning the butter) and let it cool a bit while you assemble your other ingredients.
Browning Butter
Measure your milk into a 1-cup liquid measuring cup, then add the egg, egg yolk, and vanilla and mix lightly until combined. After the brown butter has cooled slightly, add it to the milk mixture.
 
In another bowl, mix together the flour, sugar, baking powder, and salt. Add the wet ingredients to the dry ingredients all at once and mix just until the dry ingredients have been incorporated. Gently fold in the blueberries and divide between muffin liners.
Streusel Streuseled
In a small bowl, mix butter, flour, and sugar together with a fork or your impeccably clean hands until no large lumps of butter remain and your mixture is coarse and crumbly. Divide evenly over the muffin tops. it will seem like you are overloading them, but trust me, you're not.

Bake for 18-20 minutes. Muffins should be golden and crisp on the top, and a cake-tester will come out clean.

Let the muffins cool 15 minutes in the pan before removing.